How to look at the opportunities each tool offers.
Moodle is a powerful environment with a variety of tools right at your finger tips. Are you making the most of them, or are you just using each activity or resource based on what it is called? It is really easy to fall into a rut of always doing what you have done before or just following the bouncing ball. Now is the time to take a fresh look at how you Moodle.
Each activity and resource in Moodle has a name which indicates a possible use and each one has a description which contains some ideas for use. But if you really want to delve into what is possible, take a look at the settings each activity and resource has available. The settings tell you what is possible on a technical level, then add your imagination and creativity to expose the true possibilities. All you need to do is go into the tool’s settings, click on Expand all and start really looking at what is on offer.
Not sure where to start? Here are some ideas to kick things off…
Let’s start with the activity called Glossary which can of course indeed be used as a glossary. Let’s say you want to provide a glossary of terms for your learners. This tool is a pretty easy way to do so and the bonus is wherever the term appears throughout the Moodle course, it will be hyperlinked to the Glossary entry. Of course you could turn this into an activity and have the learners contribute to the glossary to build a collaborative resource, but this is still just simply using the tool as a fundamental glossary.

Now let’s think about the Glossary settings. The settings allow you to set up a searchable collection. So let’s say you have many videos you would like learners to access. You could use the Glossary to set up this collection of videos. You can have each video as an entry in your glossary, you may even decide to add files to supplement each video. Your learners can now search for the video they looking for or use the alphabet tool to help them. The category feature of Glossary can also be really useful in this situation. You could set up topics as categories and then as you add videos, simply choose which category or categories they belong to. Now your learners can very simply find and watch videos.
You could extend this idea to use a Glossary to provide the resources for an entire Moodle course that has multiple sections or topics. Let’s say each section of your Moodle course covered a different topic and you had numerous resources for each topic. You could put a Glossary at the beginning or end of the course, set up a category for each topic or section and then simply add each resource as an entry. You could even add a link to the resources at the end of the section by linking to the relevant Glossary category.
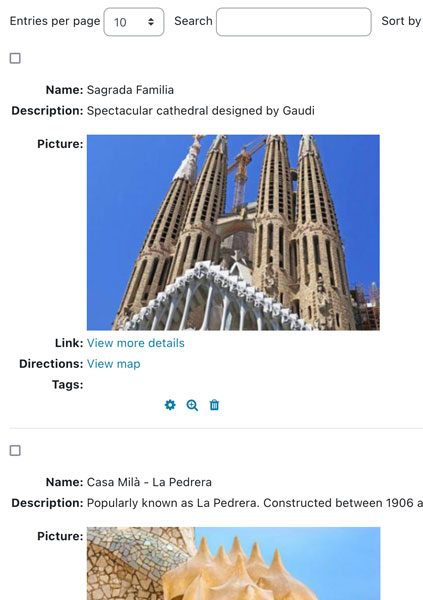
If you reach the limits of what the Glossary tool can provide, it is time to investigate the Database activity tool. The Database tool provides you with a couple key advantages over the Glossary. Firstly it supports groups, which the Glossary does not. Secondly, it allows you to require that a learner must add an entry before viewing what others have added. So now you have the advantage of a learner first adding their contribution to the activity and then additionally benefiting from exploring how others completed it. Thirdly and perhaps most importantly, Database allows you to set the fields and format for how you would like learners to contribute their entries. The Glossary doesn’t give you any control over how you want learners to structure their entry.
The Database tool allows you to create your own canvas for how learners add their entries. Just think what you could do with it! You might set learners a research task and then they contribute what they found to the Database using the fields that you have setup. Remember it is searchable, so you could create a collection of resources that your learners can browse or search. You could even use it to set up a searchable repository of webinar recordings.
Now let’s look at a very simple tool that you may have overlooked. The Choice tool has settings that may seem very simple, but think of it as an amazingly quick and easy way to set up an interactive tool in your Moodle course. You can use it as either a private learning tool or a shared interaction. This tool is truly only limited by your imagination. Just consider the potential…perhaps you would like your learners to book in for a time with you, or perhaps you would like them to choose which topic they are going to do a project on, or choose a group of learners they will work on a project with, or perhaps as a tool to check on their confidence level periodically throughout the course.
Ready for your next adventure? The Lesson tool is a great way to set up a learning pathway or journey in your Moodle course. Now of course you could just use the Lesson for pages of content interspersed with questions to check understanding, but why limit yourself when you can do so much more! The Lesson tool allows you to create pathways which means you could use it to set up a scenario. A scenario allows you to immerse learners in decision making in a safe environment where they can repeat the activity as many times as you like to gain mastery and to explore the potential outcomes based on different decisions. Now if you take that idea to the next level you could even use the Lesson tool to create an escape room!
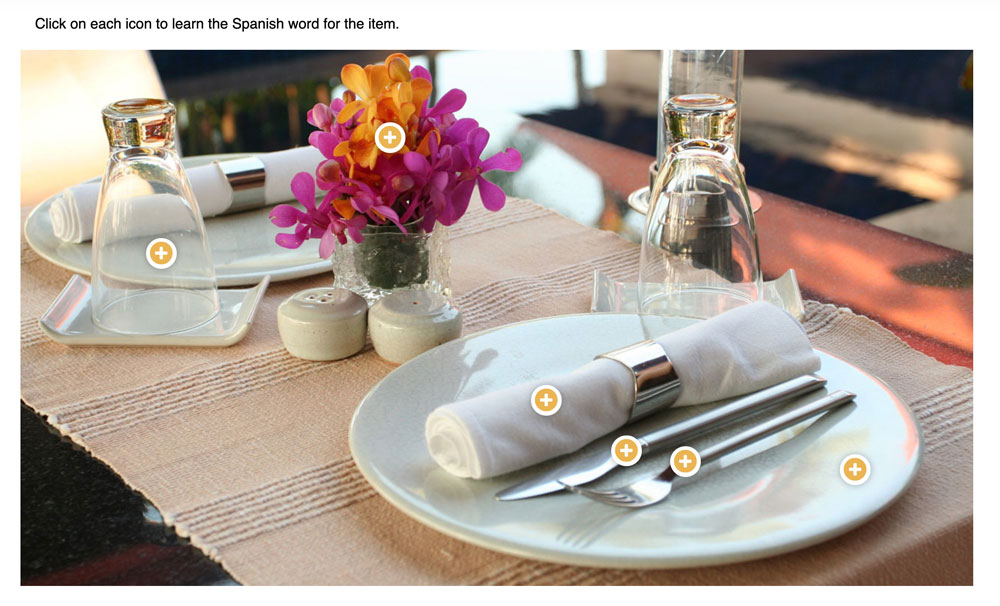
If you would really like to take your Moodling to the next level, remember to leverage H5P, which is now core within Moodle. You could add H5P as an activity to your course page but remember that anywhere you see the text editor you can embed H5P directly into Moodle. Once again let your imagination go wild and you have so many possibilities! Turn bland into interactive and engage your learners. Why not start by simply embedding H5P into your course page using a Label. Or spice up a Moodle Page or Book with some hotspots, accordions and drag and drop activities to bring your content to life. You could even embed a course presentation into a Moodle book to create a mini scenario within your content.
Now with so many ideas at hand it is time to jump into your Moodle course and start exploring the activities and resources with fresh eyes. Open up those settings and see where the potential can take you.